Monday, August 24, 2015

Freezer Cooking

One of the reasons that the American diet is so packed with convenience foods these days is that most people just don't have the time to do much cooking. During the week, it's a dash from work to pick up the kids, get home, feed them, and shuttle them back out to their weeknight activities. There is just no time to dice, chop, simmer, and saute.

Around this time vacuum, several solutions have been created. Of course there is take-out food, but everyone knows that's not a healthy way to go. Then there are prepared, packaged meals, loaded with preservatives and additives. Recently there are also services like Plated or Blue Apron, where all of the prep work is done for you and fresh, perfectly portioned ingredients are delivered to your door, but these cost more than many families can reasonably afford on a regular basis.

20 meals, prepped and ready to freeze
The best solution I have found is called freezer cooking. This is where you buy your own fresh ingredients and do all of your prep work in one session, then freeze the recipes before cooking them. During the week you just thaw the meals and pop them in the oven/slow cooker/skillet. I like this option because it gives you complete control over what you're putting on your family's dinner table. And often you can prep many meals in just a couple of hours.

Over the weekend, my husband and I worked together to prep 20 crockpot freezer meals in a little over 2 hours. This means for the next month (roughly) most of the cooking work is already done.

But how to manage such a daunting task? There are as many options as there are cooks who go this route. If you're already planning your meals in advance, it doesn't take much work to convert your favorite meals to freezer meals. There are just a few things to keep in mind.

First, how to store all of these great recipes until you're ready to use them? Unless you have a stash of casserole dishes and storage ware that rivals your local kitchen store, you're probably going to need another solution for storage. As you can see above, I often go the freezer bag route, but you can also use foil baking pans. These tend to be relatively cheap at your local grocery store, and since you store and bake in the same disposable dish, they make cleanup a snap. With either of these methods, you can use a sharpie to write on the outside any cooking/finishing directions to help keep yourself organized.

Next, how do you convert recipes for freezer cooking? This works best on recipes that are one-dish meals, but of course you can also prep and freeze separate main dishes and sides. You also want to be aware that some ingredients may not freeze very well:

  • Potatoes: the texture gets a little odd in the freezer. Not a big deal really in a long-cooking soup or if you're using shredded potatoes like hash-browns, but you don't want to stick your whole baking potatoes in the freezer. Some say other high-starch items like pasta also should not be frozen, but I've done plenty of casseroles and soups with pasta included and never had a problem. 
  • Sour cream, cream sauces: these can work out okay if they're used in small amounts in something like a casserole, but often they will separate when frozen so use sparingly.
  • Sauces thickened with flour or cornstarch: these will separate, so mix up your sauce as usual and freeze, but wait to thicken it until just before serving. 
  • high-water-content veggies and fruits (think celery, cucumber, lettuce, melons, etc.)
  • mayo
So what to do if your favorite meals contain the above ingredients? No problem! Just prep the rest of the ingredients and save the tricky bits for the day you're planning to serve the meal. It takes very little time to dice up a couple of potatoes and throw them in the pot when the rest of the recipe prep is already done.

Of course, you can also use resources found online to make your freezer meal prep even easier. I have a collection of recipes already altered for freezer prep on my Freezer Meals pin board to help get you started. If you're at all unsure about how this freezer meal thing should work, I highly recommend using these resources the first time around.

Then there is the super easy and quick way: pre-planned freezer meal sessions. There are a lot of bloggers out there who have already done all of the work for you and sell entire freezer meal prep session instruction packets. The 20 meals we prepped this week are from one of I Am That Lady's Aldi Meal Plans. For just $4 she has already created meal plans with complete instructions and a great system for assembly-line-style prep. Well worth the money in my book.

However you choose to do it though, with all the busyness of back-to-school, this is a great time of year to start a freezer meal plan!

Friday, August 14, 2015

Lemon Chicken and Broccoli


I adapted this one from a recipe by Life in the Lofthouse. Her version is super simple and yummy too, but I wanted to turn it into a full meal.

Ingredients

  • ¼ cup all-purpose flour
  • 2 tsp Italian herb blend
  • 3-4 Large boneless, skinless Chicken breasts, cut into tenderloins
  • 4 Tbsp olive oil
  • salt and pepper
  • 1 packet Italian dressing/seasoning mix
  • ½ cup fresh lemon juice
  • ½ cup chicken broth
  • 2 cups frozen, chopped broccoli, thawed
  • 1 cup jasmine rice
  • 1½ cups chicken broth

Steps

  1. Mix the Italian herb blend with the flour and place in a wide, shallow bowl.
  2. Rinse the chicken pieces with water, and then lightly coat them in the flour. You don't need perfect coverage, just make sure that some of the flour sticks to all sides of the chicken (see below left). Set aside.
  3. Heat 2 Tablespoons of oil in a large skillet, over medium-high heat. When oil is runny, add half of the flour-coated chicken pieces. Season with salt and pepper if desired. Cook chicken for 3-4 minutes or until slightly brown on each side. The chicken doesn't need to be cooked all the way through, just enough to make the breading stick well (see below right).
  4. As pieces get done (larger ones might take a little longer, so they may not all be done at once), place them in the bottom of your crock pot and turn it on low.
  5. Add the remaining oil to the skillet, and cook the rest of the flour-coated chicken pieces, then add them to the crock pot.
  6. Sprinkle the Italian dressing/seasoning mix evenly over the chicken. Pour the lemon juice and ½ cup of chicken broth over the it all. Cover with lid, and cook on low heat for 3-4 hours. If you haven't already, this is a good time to take the broccoli out of the freezer.
  7. About half an hour before you are ready to serve, dump the chopped broccoli on top. No need to stir, just set it in there.  
  8. 15 minutes before meal time, bring 1½ cups chicken broth to a boil in a medium sized sauce pan. Once it is boiling vigorously, lower heat to a simmer and stir in rice. Cover and cook for 15 min. 
  9. Serve the chicken and broccoli combo over rice, with sauce. You can either serve the chicken pieces whole or shredded (as above). Enjoy!

Wednesday, August 12, 2015

Top Ten Spices in My Kitchen

photo credit: Knoflook
via photopin (license)

1. Garlic

If you've read anything at all on this blog before, you probably know that I'm a huge fan of garlic. What you might not know is that in addition to the fresh garlic that I always have handy, I also keep some of the powdered stuff for when I just want to add a little more of that flavor to a dish that's already been finished. I also like to stir it into a little melted butter and dip Italian bread.


photo credit: #Zingiber #officinalis
#Zingiber #ingver #džumbir

via photopin (license)

2. Ginger

Again, this one I like to have both fresh and powdered. The difference in flavor between the two is enough that it's almost like having two completely different seasonings. Ginger has an interesting history. It's a big part of Chinese traditional medicine and was also very commonly used in the Middle East. At one point it was so popular in Europe that it was a standard part of any table setting, like salt and pepper today. In English pubs it was sprinkled on top of beer, providing the origin of the popular soda that shares its name. I love it for the distinctly Asian flavor fresh ginger can give to any meal, and of course it's great in baking too!


photo credit: Old Bay
via photopin (license)

3. Old Bay Seasoning

This is my go-to all-purpose blend. When I'm doing something super simple like frying up pork chops, I'll sprinkle them with a little Old Bay for flavor. It's a very versatile mix of spices and I haven't found anything it doesn't suit. This particular blend is relatively new to the culinary world, having been developed in 1939.


  photo credit: Italian Herb Mix
via Wikimedia Commons
(license)

4. Italian Herb Blend

This was my fave before I discovered Old Bay. I still use it a lot if I'm looking for more of an Italian flavor to a meal, or if I'm wanting flavor but no heat.


photo credit: paprika
via photopin (license)

5. Smoked Paprika

Paprika is one of the most under used and under appreciated seasonings in this country, in my opinion. I sprinkle a little on top of my baked mac 'n' cheese, add it to the breading when I'm frying chicken, and sprinkle it over top of steamed veggies. It's got a great smokey flavor that I simply adore. And if you're lucky enough to live in a country where paprika potato chips are available, you have to try them. They're kinda similar to the BBQ chips available here in the US, but way better.


photo credit: Fresh Basil 340/365
via photopin (license)

6. Basil

Fresh basil is great for adding amazing flavor to dishes at the last minute, but I rarely have it on hand. I hope to change that soon when I get my herb garden started, but that project has been on the to-do list for way too long to think I'm going to get around to it anytime soon. So mostly I cook with dried basil. Quality makes a huge difference here, and I'd say if you can afford to buy the fresher (but typically more expensive) stuff, you will not regret the investment.


photo credit: Ρίγανη
    via Wikimedia Commons    

7. Oregano

Oregano is one of those herbs that is actually better dried than fresh. No really. Drying out the leaves actually brings out their flavor. And who doesn't love that flavor? I often cook with basil and oregano together because they compliment each other so well.


photo credit:
  Canela en rama, stick cinnamon.  
via photopin (license)

8. Cinnamon

I know many people probably think of sweets and baked goods when they think of cinnamon, but I also use it in savory dishes. Lots of Mediterranean and Mexican foods are amazing with just a little thrown in. Want to take your Greek cooking to the next level? Grab the cinnamon. Looking for a Mexican twist on hot cocoa? You guessed it. Just add cinnamon. I also sprinkle it on my coffee or tea in the morning, or top off a bowl of yogurt with it, and of course who doesn't love cinnamon toast?


photo credit:
  Clagett Farm Cayenne Peppers 
via photopin (license)

9. Cayenne Pepper (or Chili Powder)

When you want to add a bit of heat to a dish, you can't really go wrong with these peppers. Think of it like a much, much stronger version of paprika. And the bright red color really adds to the visual appeal of a dish too!


photo credit: Cumin
via photopin (license)

10. Cumin

Cumin is one of the oldest seasonings still in common use today. It was originally a staple of ancient Egyptian culture, then adopted by the Greeks, spread by the Roman empire, and found a home in India, Portugal, Spain and Mexico. Any spicy food can benefit from the addition of cumin, but it can overpower more delicate flavors so use with caution.


Monday, August 10, 2015

Sausage, Spinach and Bean Soup in the Crock Pot


I adapted this soup slightly from a recipe found here

Soup in the middle of the summer (especially here in Texas) seems out of season to a lot of people. To me, if I'm going to make a hot dinner anyway, I'd rather not heat up the oven (and therefore the whole house) or spend a lot of time standing over a hot stove top. So yes, I make a lot of soups year round because I can throw them in the crock pot and walk away from the heat source.

One little trick that I've picked up about making soups with fresh herbs is the use of a tea ball. It's so much simpler to just stuff your herbs in here and then not have to find and pick them out at the end. Or worse, wind up with a whole bay leaf (example) in your mouth because you thought it was a piece of spinach. I prefer the style pictured to the left, because the handle makes things easier for me, but the chained type work as well. Just make sure the ball itself is large enough to accommodate whatever herbs you might choose to add. If you do use the chain type, make sure to fasten the chain to something outside your pot so it doesn't slip in, and whichever kind you pick, remember that it will be HOT after simmering for a while, so be careful when removing it.

So, on to the recipe!

Ingredients


  • 3-4 cloves garlic, minced
  • 1 onion
  • 3 carrots
  • plenty of spinach or kale
  • 2 cans of white beans
  • 1/2 tsp dried oregano
  • 2 whole bay leaves
  • salt and pepper to taste
  • 4 cups chicken or veggie broth
  • 2 cups water
  • 1 Tbsp olive oil
  • 1 package of your favorite smoked sausage


Steps


  1. As always, start by mincing your garlic. You can just toss it in the bottom of your cooker right away. The time it takes to chop the rest of the veggies should be plenty long enough for it to sit before cooking.
  2. Chop your veggies: onion, carrots and greens. For recipes like this, I set the inner bowl part of my crock pot on the counter next to my cutting board and just dump ingredients in as I go. The original recipe says not to add the spinach until you're almost ready to serve, but I prefer to cook it in with the rest as it yields a more flavorful broth. It doesn't look as pretty when finished though, so there is a trade off.
  3. Drain and thoroughly rinse your beans and dump them into the pot too. 
  4. Add oregano, bay leaves, salt and pepper, and any other herbs you like. For this recipe I keep the bay leaves separate in the tea ball and everything else just gets tossed in the pot. 
  5. Pour the broth and water over top and give it a good stir. 
  6. Cover and cook on low for 7-8 hours or high for 3-4 hours.
  7. About 30 minutes before serving, heat olive oil in a large skillet over medium high heat. Add sausage, and cook, stirring frequently, until lightly browned on all sides. Stir cooked sausage into pot. The original poster did this step first, and that's certainly an option. I find that long cooking smoked sausage sometimes saps its flavor though, so I add mine in at the end. You'll get less sausage flavor in your broth, but more sausage flavor in your... sausage. Which is where I prefer it to be anyway!
  8. Serve with crusty bread or oyster crackers, and if you like, sprinkle a little shredded cheese on top (white cheddar is an excellent choice). 

Thursday, August 6, 2015

My Favorite Skillet, because Good Cookware Matters

One of the important factors in cooking that lots of people don't even think about is cookware. I know I never did. At least until I got my hands on the good stuff!

Several years ago we had a friend staying with us while he was raising funds to be a missionary overseas. When he moved out he left us with a lot of his stuff, since he couldn't really take it with him anyway. Since he's an excellent cook, he had some really nice cookware that I've been using ever since. Probably my favorite piece, and the one that almost never gets put away for more than a day or two because it seems like I use it constantly, is my saute pan. If you've been following this blog, you've seen this pan in several of the recipes I've posted already, and I'm sure that you'll see it again many times. It's from the Wolfgang Puck Cafe Collection and best I can tell is no longer in production as I can't find it online anywhere. So I've put together a slide show of similar pans on Amazon, for those looking to upgrade their own cookware. 


As you can see, the price of decent cookware varies. In just the five items I've collected, they range from $40 all the way up above $250. I've tried to only include pans comparable to the one I use and love, but of course since I don't own any of these individual pieces, I can't vouch for their quality. Read through the reviews and decide for yourself.

Here are the features that I love about this particular piece:

1. Stainless Steel

All of my previous pans were non-stick, teflon-coated nightmares. It sounds so good after all: non-stick. The thing is they aren't really. They're actually less-likely-stick. But if you cook with them often enough, you will eventually get something stuck on there. And then you might as well throw the pan out and start over because you're not going to get off the stuck-on food without destroying the non-stick coating. Of course, that's assuming the coating hasn't been destroyed already in the cooking/washing process. I've never had luck keeping these darn things from getting scraped up. Possibly because I was buying the cheap ones, but I'm told even the really expensive ones need to be handled with care.

My stainless steel pans are a different ballgame altogether. I can stir things with a fork. I can cut meat right in the pan. I can scour the darn thing with steel wool if something is really stuck in there. And I never have to worry about scratching the finish because this baby is made to take a beating and come out shiny and clean and ready for the next recipe I throw at it. I have learned to keep things from sticking by making sure there is at least a little oil in the pan before I start cooking. With some foods (the ground sausage from yesterday's recipe for instance) the oils are already in there and I don't have to add a thing. With others I just heat up a little olive oil in the pan before adding my food. Couldn't be simpler. 

photo credit: Flipping Sweet Potato Pancakes... via photopin (license)

2. Large, with Deep Sides

Since I do a lot of one-pan type dishes, I need a pan that holds a lot of food. I want to be able to stir that food easily without it falling out the sides. Mine is about 11.5" across and has about 3" vertical sides. I have yet to try a recipe that did not fit.

3. Dishwasher and Oven Safe

Okay, the dishwasher thing is all about convenience. If you don't mind washing by hand this is totally optional. 

The oven safe thing is a little more crucial. I've come across several recipes that start on the stove top and end in the oven. Unless you want to have to switch pans midway through (and invert your recipe which can sometimes make a big difference), you need a pan that can do both. It's also nice to be able to brown the cheese on top of a recipe by just popping the whole pan in the broiler for a minute or two.

photo credit: scallops via photopin (license)

4. Handles, Plural

I have seen (and owned) lots of pans of roughly this shape and size that only have the one long handle on one side. When they're full of dense foods, that makes it somewhat hard to lift the pan without sloshing food out the opposite side. I love the little mini-handle across from the main one because it lets me move a full pan around without risk of spillage. It's sometimes the little things in life that make all the difference!

photo credit: Pan on hob via photopin (license)

5. Glass Lid

This one is not super crucial, but can be very handy. Lots of recipes have a step that reads "cover and simmer until reduced by half." So, if you have a solid pan lid, you can guess when it's ready and hope you didn't guess too long, or you can keep checking it every few minutes and get a face full of steam each time (super fun if you wear glasses like I do). With a glass lid, I know at a glance whether something has reduced enough. Much better.

-----

I can't stress enough how much good cookware really does make all the difference in your cooking experience. Of course, your needs and preferences may be very different from mine. And that's fine. What's important is to use pots and pans that work for you instead of against you. If you don't have the budget to go out and replace all your pots and pans (and who really does these days?) I would suggest you start by just replacing your most-used item. If you don't feel like the expense made a big difference, stick with what you've got. Otherwise, you can replace piece by piece until you have cookware that is a pleasure to use, rather than cookware that gets in the way.

Wednesday, August 5, 2015

Sausage and Peppers in the Crock Pot

Just dumped this in and gave it a good stir.
You can see the onions are still completely raw.

This is an easy and yummy recipe I adapted from shugary sweets. It only takes a few minutes to throw together, is very versatile, and will feed a crowd (or make plenty of leftovers). Best of all, it's one of those recipes that just makes the whole house smell yummy when you walk in the door.

Ingredients


  • 2-3 cloves of garlic, pressed
  • 1 large or 2 small onions, diced
  • 3 green peppers, seeded and diced
  • 1 ¼ lb ground Italian sausage 
  • 2 cans (14.5oz each) Diced Tomatoes
  • 1 can (14.5oz) Tomato Sauce
  • 1 can (6oz) Tomato Paste
  • Spices to taste: parsley, oregano, basil, Italian herb blend
  • Optional: hoagie rolls and provolone, pasta, any Italian cheese of your choosing

Steps


  1. Press/Mince your garlic.
  2. Chop the veggies. You're going for bite sized chunks.
  3. Brown the sausage in a skillet until completely cooked.
  4. Drain and add meat to your large crockpot. 
  5. Add garlic, veggies, tomatoes (all four cans), and spices. 
  6. Stir until combined well.
  7. Cover and cook on low for 6-8 hours.

If you're going the hot sandwich route, just before serving line your rolls with provolone and stick them in the broiler for a few minutes. You just want to toast the bread and melt the cheese. Then add the sausage/veggies with a slotted spoon, being careful not to get too much liquid in there and make your bread soggy.

I also like to serve this over pasta with a little mozzarella or parmesan sprinkled on top, and often my hubby eats the leftovers just as is. You can spice it up by using hot Italian sausage or adding red pepper flakes.

Tuesday, August 4, 2015

My Favorite Meal Planner: Copy Me That

I've tried out and used several different apps to help me get organized in my meal planning endeavor, but the one that I'm most pleased with is Copy Me That (CMT).  It's available for free on Android and iOS and also can be accessed directly from your favorite browser to make it super simple to grab recipes from blogs and websites. So how does my meal planning process work using this handy little tool? For the sake of this tutorial. I'll be going the browser route as that's how I usually do the actual planning. I then shop and cook from the app.

Step 1: Importing Recipes

First things first: you'll need to sign up for the service here. If you might want to share your account with a significant other or roommate, I highly recommend NOT signing up with facebook. Sharing accounts it totally okay on this particular site, and even encouraged.

Once you're properly signed up, CMT will walk you through installing the button on your chosen browser. I use Chrome, but this will even work in ie, so I doubt you'll have trouble no matter what browser you prefer.

There are, of course, a multitude of ways to find recipes online. I won't go into all of the detail here, but most of my recipes come from Pinterest. If you are fond of both cooking and the internet (and I can't imagine how you'd be reading this otherwise), you really should be on Pinterest. 

Go ahead and locate a recipe you would like to try and click the CMT button you just installed. As an example, I'm going to use the Eggroll in a Bowl recipe I posted here yesterday. After a second or two, you should see the box to the right appear in the upper right of your screen. Click where it says View recipe to finalize the import. You should then see a screen that looks very much like this:

This is where you confirm what you want to keep or remove from the recipe. Don't worry, this is not the main editing tool, it's just a quick way to delete things you know you don't want. Check or uncheck the boxes along the side, add a description, add tags, change the image if you like, and when you're done click the green Confirm button. Congrats, you've just imported your first recipe!

The next page you'll see is the recipe's main page in your CMT profile. If you cook from the app, this is what you will be looking at while you do. From here, we're going to primarily look at the six buttons in the upper right that I've numbered in blue below:

  1. Add to shopping list. This will dump all of the ingredients into a shopping list for you. The list can be sorted by category or by recipe (a handy feature that a lot of apps just don't offer). You can also do this from the meal planning screen, or even from your recipes index if you're not on the mobile version of the site or the app.
  2. Add to meal plan. You can either pick a specific date you want to add this or just add it to your queue and sort things out later. I usually add to queue while I'm still deciding on recipes for the week and then later sort them into their individual days. 
  3. Edit. This is where you can really play around and change up your recipes. Already cooked this once and decided it needed more (or less) of an ingredient? Go ahead and change it. Want to add a note on a particular step? You can do that too. Have some overall notes you'd like to keep with the recipe but maybe not in the actual cooking steps? There's a place for those right there at the bottom. I often add things like "I wonder what this would taste like if I added some ____." so I can remember to try that next time. 
  4. Print. If you're not so much the cook from an app type, and would prefer an actual paper printout of your recipe, here you go. 
  5. Share. Everything is social these days and CMT is no different. Here you can share the recipe to facebook or via email. You can also change your sharing settings so that others can or can not by default see your recipes. You can then share your entire collection with friends and family.
  6. Delete. Mostly, I use this when I try a recipe that just does not work out and I have no interest in fixing. But good for those oops moments too. 

Step 2: Create a Meal Plan

So now you have a few (or many, go you!) recipes loaded into CMT, where to go from here? Survey your freezer/pantry/fridge for inspiration (still have several chicken breasts left from that bulk package we bought last week and I really need to use up the rest of this spinach before it goes bad), ask your family if they have requests (the little ones want to do a taco night, hubby really loved that meatball soup a few weeks ago), and consult the sales at your local stores (wow, sausage is cheap this week! and it looks like broccoli is in season). Then pick several recipes that will work all of these suggestions together (or at least as many as you can) and stick them into your meal planner. Here's how the above suggestions might play out over a week's worth of dinners: 


If you picked a date for your recipes when you added them to the meal planner, they should already be sorted out for you. Otherwise they'll be in the queue above the actual days of the week. Just click a recipe in the queue to select it and then click where you want it to go. This also works to move recipes out of the days and into the queue (oops, the market was out of that ingredient this week, I'll save this recipe for next week) or to move them between days (the weather is supposed to be rainy on Wednesday, I think we'll do a soup that day and move the skillet meal to Thursday). You can also add notes (as Monday and Friday above) by clicking in the blank space under the day of your choice. Notes can then be moved in the same way recipes are.

Step 3: Shopping List Time

So now you know what you want to cook this week. Time to get all of your ingredients together so you can actually get it done!

If you added each recipe from the shopping list earlier, you can just click directly over to the Shopping List link at the top of the page, but if you missed some (or all) you can add them directly from this page by clicking the blue options link below each recipe. Once they're all added, your list should look something like this:

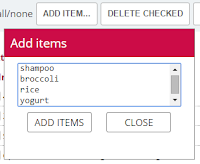
Now you can add in those items that maybe weren't in recipe cards by clicking Add Item at the top. Just list them all in the little pop up box, one per line and then click add items. They will appear at the top of your list (in recipe sort). 

Next, it's time to check off all of the items you already have on hand. This is when I switch over to the app. It may also be easier if you change the sort mode to category. Because ingredients are pulled directly from recipes, you'll see basic pantry staples (like salt and pepper) or other things that you don't need to go out and buy (1 cup of water) so make sure you check off what you already have. Then click "delete checked" at the top. This usually will at least cut your list in half. 

Now you're ready to conquer a week's worth of meals! Of course, if you prefer to plan way ahead, you don't have to only do one week. CMT will let you meal plan way out in advance, so feel free to plan as far as you like. You can always adjust later if needed.

Monday, August 3, 2015

Quick and Easy Eggroll in a Bowl

This is another of my favorite quick and easy recipes. The original comes from Mostly Homemade Mom, though as usual I've changed a few details to fit my own tastes.


Ingredients


  • 5 cloves garlic, pressed
  • 1 lb ground mild italian sausage (or turkey sausage)
  • 1 bag dry coleslaw mix 
  • 1/2 cup low sodium soy sauce
  • 1 teaspoon ginger
  • red pepper flakes (to taste)
  • sliced green onion
  • sour cream (optional)

Steps


  1. As always, start by pressing your garlic. Set aside.
  2. In your largest, deep skillet, brown sausage. The original recipe calls for country sausage, but I prefer the flavor of Italian sausage. Surprisingly, it goes really well with the soy sauce and ginger!
  3. Meanwhile in a small bowl, combine garlic, soy sauce, ginger, and red pepper flakes; set aside.
  4. Once sausage is cooked through, add dry coleslaw mix to skillet and stir to combine. It will look like way too much when you first dump it in there, but the cabbage will wilt down to about half size, so really do use the entire bag.
  5. Pour sauce over everything and stir in well, continuing to cook over medium heat for about 5 minutes or until cabbage is wilted and the texture is as you like it.
  6. Serve with sliced green onion and maybe a dollop of sour cream.

Friday, July 31, 2015

Let's Talk About Garlic

photo credit: Garlic via photopin (license)

I love garlic. Seriously.

Health Benefits


In my last post, I mentioned a tip on prepping your garlic a few minutes before cooking it. This is something I did not know for a long time, and I used to often press my garlic directly into the pan. Since changing the way I do this, in addition to the health benefits, I've noticed that the flavor of the garlic is better.

But what exactly are these health benefits? Here are a few, in no particular order.
  1. Garlic is a natural antibiotic and antifungal.
  2. Garlic helps prevent certain types of cancer.
  3. Garlic can help prevent food poisoning.
  4. Garlic is good for your heart.
  5. Garlic can help prevent blood clots.
  6. Garlic may help boost weight loss.
  7. Garlic fights acne.
  8. Garlic may help prevent hair loss.
Of course, this list is not nearly exhaustive. A simple google search would no doubt turn up plenty more benefits. 


Prepping Garlic


Lots of home remedies use raw garlic. Personally, I'm not a fan of raw garlic, but my husband has chewed it a time or two to help fight off a cold. But how do you get the best benefit out of the garlic you cook with? As mentioned before, you want to let it sit a few minutes. There are two compounds found in raw garlic (alliin and alliinase) which combine to form allicin. These compounds are released when the cell walls in the garlic are broken (when you cut, mince, press or puree your garlic). However, application of heat before they are given time to combine can destroy the alliinase, preventing the chemical reaction from ever happening and destroying many of the health benefits of eating garlic in the first place. In addition to health benefits, allicin is what gives garlic much of its flavor, so you're not doing your taste buds any favors either.

So how do I prep my garlic anyway? There are several ways, with their own benefits and drawbacks. My preferred go-to method is to break out my trusty garlic press. I use the one pictured here. I bought it at Ikea. It was cheap and simple and entirely made of stainless steel, so I figured it would last a while. Boy was I right. The little cup the garlic sits in found its way into the garbage disposal once and got a little dinged up, but overall the thing has stood up to every abuse I've thrown at it. I also love that I don't have to worry about peeling the garlic (a sometimes difficult task that often leaves your hands stinky) before dumping it in the press. Bonus!

I just put my garlic in the little metal cup, one clove at a time or two if they're really small, and squeeze the handle. I usually have a butter knife at the ready to scrape off the bits still clinging to the bottom, and to help scoop out and discard the paper from inside. This way I never have to actually touch the garlic oil and my hands remain stink free.

Of course, there are some times when I go ahead and peel and then roughly chunk up my garlic too. And other times when I just peel it and throw it in the pot whole. But for about 95% of my recipes, I've found the press makes things quick and easy, and best of all—tasty!

Thursday, July 30, 2015

Dinner Last Night: Korean Beef Rice Bowls


One of my favorite quick and easy recipes is Korean Beef and Rice from Six Sisters. This is a simple, quick recipe made from ingredients I almost always already have on hand. In fact, the only item that I had to actually add to my shopping list this week was the ground beef! I do change up a few ingredients though. Here's my version:

Ingredients

  • 3 cloves garlic, pressed (or minced)
  • 1 cup (dry) jasmine rice
  • 1½ cup any broth
  • 1 Tbsp oil
  • 1 lb lean ground beef
  • ½ cup brown sugar
  • ¼ cup soy sauce
  • ¼ tsp ground ginger
  • 1 tsp crushed red pepper
  • green onions, diced

Steps

  1. Begin by pressing (or mincing if you don't have a garlic press) your garlic. To get the best health benefits, always let your garlic sit for a few minutes after mincing it to give the alliin and alliinase time to combine and form allicin before applying heat. Set pressed garlic aside.
  2. Bring broth to boil in a medium saucepan. I used some leftover beef broth from earlier in the week, but have used chicken or veggie broth and it comes out just as well. This will give your rice some flavor and keep it from clumping.
  3. Once broth is boiling, stir in rice and cover. Reduce heat to simmer and allow to cook for 15 minutes.
  4. Heat oil in a large skillet over medium heat until runny. The original recipe calls for sesame oil, which I suppose would be more authentic, but I tend to use what I have on hand. Usually olive oil.
  5. Brown beef and garlic.
  6. Drain the fat (if any) and add brown sugar, soy sauce, ginger, and red peppers. Again, the original recipe calls for salt and pepper in this step, but I actually liked this better the time I forgot to add them, so now I never bother. There is plenty of flavor with the sweetness of the brown sugar, the saltiness of the soy sauce, and the bite of the red pepper.
  7. Mix well and simmer for a few minutes to blend the flavors.
  8. Serve over rice and top with plenty of fresh chopped green onions.

Wednesday, July 29, 2015

Just Getting Started


Welcome to my brand new blog, BunGirl Cooks.

I've been learning the art of cooking over the past few years and I love to try new things, so I thought it might be fun to share with the world. In this blog I plan to feature recipes, tips and tricks, and cooking-related product reviews.

As a kid, I never learned to cook. My mom says she had to keep my sister and I out of the kitchen because we both thought raw meat was "gross" and we'd refuse to eat it if we saw it before it was cooked. I'm still not a fan of the slimy feeling of raw meat, but I've gotten over it enough that I can handle it and cook with it.

Then I got married. My husband grew up in a single-parent home, and as the oldest child he did a lot of the "cooking" for his younger brothers. From what I gather, this mostly involved reading and following the directions on the back of the package. Neither of us had the slightest idea what real cooking was. For too many years, we'd eat fast food, hamburger helper or canned soups almost every night. If it required more than "open package, dump in pan and heat up" we did not do it.

Not too long ago, I started learning about nutrition and diet and what America's over-processed, a-bit-too-convenient food culture is doing to our health. I decided that it was time to start incorporating more fresh ingredients in my diet, and time to learn just what it is I'm putting into my body. Note: this is NOT a healthy food blog. I don't do low fat or low cholesterol. I don't avoid carbs. I love cheese, red meat, and pasta. Some of my recipes are healthy, but many are not. For now, I'm less concerned with proper nutrition and more concerned with reducing my reliance on overly-processed packaged foods.

Since my hubby's job keeps him working odd hours, and often I don't know exactly when to expect him home, I rely a lot on my crock pot. I love making soups and stews from scratch because it doesn't matter if they cook an hour longer than I expected. In fact, sometimes they're better that way! On the nights he's not working late, I like to do quick and easy meals so I still get to spend time with him instead of spending all evening in the kitchen. Often these are one-pan type meals.

I've also learned to love the art of meal planning. Every week I plan out 4-5 dinners (there are only two of us so we eat a lot of leftovers) and compile a single grocery list so I don't have to run out last minute to get an ingredient, nor do I have to wonder what to make for dinner tonight. This has made life so much easier!

On this blog I plan to share all of this and more. So I invite you to join me on my cooking journey and try some new things yourself!


photo credit: Truffle Box via photopin (license)